Explore your NEXT experience

Are you an Industrial Manufacturing or Industrial Maintenance and Repair professional? Explore our brand-new beta site for a customized experience.

Visit NEXT

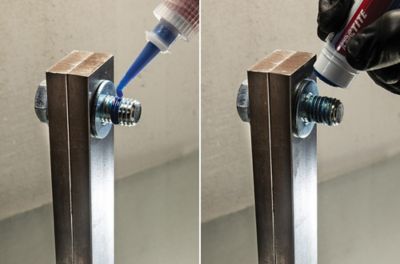
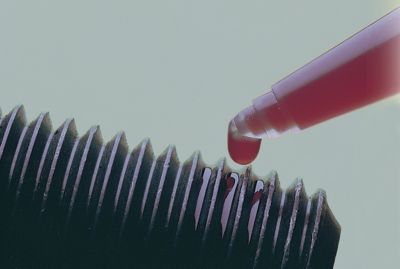
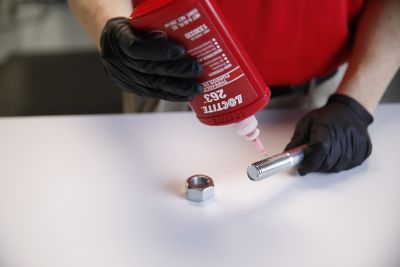
When bonding any two surfaces, having the right tool for the task is vital. This is particularly true when working with threaded assemblies. 

These types of fasteners can experience challenging service conditions. Subjected to vibrations, environmental extremes, torsion, bending and shocks, they can be susceptible to loosening and leaks. 

The right adhesive helps assemblies to stay locked in place in the face of these challenges. Threadlockers from LOCTITE® have been providing high performance for decades. 

But there’s more to finding success in locking threaded assemblies than simply choosing the right threadlocker. Proper application and use is also important to ensure they perform at their best.

Threadlocking Mistakes and Pitfalls

Improper use of a threadlocker can impact its performance. Before you apply any type of threadlocker, take the time to understand:

  • The properties of the threadlocker being used
  • Where you intend to apply the threadlocker
  • Best practice application

Failure to understand the why, what and how can lead to some of the most common threadlocking mistakes.

Applying the Wrong Product

At LOCTITE®, we know the importance of ensuring you have the right threadlocker for every task. That’s why our experts are on hand to analyze your operations and support you in finding the ideal threadlocking adhesive for any application. 

Without the right knowledge and support, it’s easy to use the wrong product. 

Threadlockers are usually graded by strength, operating temperature range and maximum thread size.

The most common mistake is to assume the most powerful threadlocker will always do the job, securing bonds as tightly as possible. 

In reality, red threadlockers are most commonly deployed in the strongest, most permanent applications. These include heavy equipment, suspension and bearing cap bolts. If it’s all you have available, you might even realize you’re using the wrong threadlocker, but do so anyway.

Deploying red threadlockers as general-purpose adhesives can cause issues, especially if a part needs disassembling in the future. Red threadlockers often require heat to remove. This application of heat can damage some assemblies.

Understand the difference between threadlocker colors to ensure you always select the best product for your needs.

Using Too Much Adhesive

If you’ve never used a threadlocker before, it’s easy to err on the side of caution and apply a lot of product to ensure a strong enough bond. Most people might assume this would improve the assembly’s reliability. 

The truth is that more adhesive doesn’t automatically equal more strength. Threadlockers are designed to fill small gaps in threads, so a little adhesive actually goes a very long way. 

Overuse may cause the adhesive to spread beyond the required surfaces. Any threadlocker outside of the curing area, where air is still present, will remain liquid and not cure. As a result, many people then think the threadlocker hasn’t worked, as what you can see will look like it’s not drying, even after the 24-hour curing period has passed.   

To create an effective bond, you only need to apply a minimal amount of threadlocker to the area where the bond will be secured. Even when using a low-strength product, a small amount will have the strength required.

Lack of Preparation

LOCTITE® threadlockers are designed to perform in the presence of oil and other contaminants. But that doesn’t mean you should ignore these when applying your adhesives. Preparation is vital.

Before applying threadlocker to a new surface, many people don’t realize you need to clean the surface to avoid contaminants coming into contact with the threadlocker. Applying a threadlocker to a dirty surface can prevent proper curing by affecting the chemical performance. 

Any grease, dirt or oil present in the assembly can affect the application and slow the curing process. This can create a poor bond, which prevents the threadlocker from meeting its full holding potential.

Not Adhering to Curing Time

LOCTITE® threadlockers will only be fully cured 24 hours after application. Every threadlocker has a specific curing time, detailed within its technical data sheet (TDS), which you should look to adhere to where possible. Curing refers to the time it takes for the threadlocker to achieve its maximum strength and optimal performance. 

Threadlocker curing time is different from fixture time. Fixture time is the point where the assembly has a certain level of handling strength. But many people confuse the two. 

Fixture time can be as little as a few minutes with some products. But they still have strength to gain after this point, so should be allowed to cure fully to avoid them failing.   

If you try to make your LOCTITE® threadlocker dry faster, or start to put the assembly to use before the threadlocker has fully cured, the fastener may loosen too.

Repositioning an Assembly

In some cases, after a threadlocker has been applied, you might want to reposition the assembly. One common misconception is to believe that because it hasn’t yet cured, this is fine to do. In reality, repositioning a bond after it’s been locked in place can lead to a risk of threadlocker failure. 

As soon as the thread is tightened, the absence of air starts an anaerobic reaction in your adhesive. If you rotate the fastener during this time, you’ll disturb and break the chemical bonds, which will not reform again, even after the bolt has been tightened. This means your threadlocker will never achieve its full strength and adhesion, reducing its ability to perform.

Should you need to reposition the fasteners before or after curing, you need to remove the existing threadlocker, clean the surfaces and apply a new one. Where the application allows, you may apply a wicking grade threadlocker once the assembly position has been set.

Using the Wrong Tools for Removal

Many threadlockers are designed to be effective at holding a threaded assembly in place, as well as being removable for maintenance and repair needs. However, removal with the wrong tools can damage the application.

Low and medium-strength threadlockers can normally be removed with hand tools and enough torque. 

Problems can arise when trying to dismantle assemblies where red threadlockers are used. These often require heat for disassembly. Removing the fastener without applying high temperatures or wrenching it loose with hand tools might lead to broken bolt heads and further damage. Find out more about how to properly remove a high-strength, red threadlocker.

To avoid this and any other mistakes, follow our comprehensive guide on how to apply and remove threadlockers

Get in touch below for expert insights on how to choose and deploy the most effective threadlockers for your application. Or browse the full range of LOCTITE® threadlockers.

Contact us

Please fill out the form below and we'll respond as soon as we can. For immediate assistance with a technical request please call 1-800-LOCTITE.

There are some errors, please correct them below
What would you like to request?
This field is required
This field is invalid